Sadly I don't have a green thumb and over the years I've managed (not intentionally, of course) to kill tons of different house plants, even the ones that were supposed to be very easy to take care of :(. I do like having plants around the house though. So, when the other day I spotted an assortment of lovely succulents at a nearby store, I decided to bring some home. After all, they are used to drought so my forgetting to water them regularly should not be a problem, I hope :)


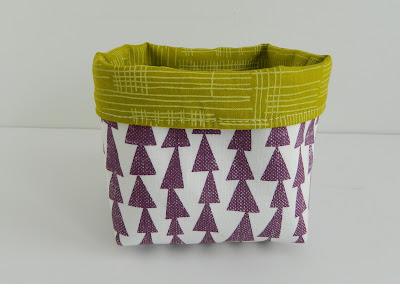
The only thing I didn't like about them were black plastic pots they came in. And so I decided to make little fabric cozies for the pots. Don't they look adorable? Such happy little plants. Make me smile every time I look at them.
Now, I'm sure I'm not the only one who dislikes having ugly plastic pots around the house, so in case you'd like to make some cute little cozies for your tiny plants, here's what you need to do.
♥ ♥ ♥ ♥ ♥
♥ ♥ ♥ ♥ ♥
Please make sure to measure how tall your pot is before you start cutting. I included measurements for two sizes of pots - smaller one is 2.5" tall, larger one is 3.5" tall. Both cozies follow the same directions for construction.

Use 1/4" seam allowance unless otherwise noted.
Materials needed for a cozy to fit a 2.5" tall pot:
exterior fabric - two 6.5" wide x 5.75" tall rectangles
lining fabric - two 6.5" wide x 5.75" tall rectangles
SF101 interfacing (or other medium weight interfacing of choice) - two 6.5" wide x 5.75" tall rectangles
1. Follow manufacturer's directions to fuse interfacing to wrong side of exterior fabric.
2. Use a ruler and disappearing fabric pen to mark a 1.5" square for small size (and 1.75" for larger size) along both bottom corners. Cut them out.

3. Mark and cut out corners on second exterior panel as well as both lining panels.

4. Place exterior panels right sides together. Stitch along the bottom edge only, backstitch at the beginning and end. Press the seam open. Use 1/8" seam allowance and stitch along both sides of the seam - this step will help your bottom seam to stay nice and flat.


5. Bring both panels right sides together, pin to prevent shifting and stitch along the side edges backstitching at the beginning and end. Press the seams open.

6. Align side seam on top of bottom seam, pin or clip to hold corner seam aligned. Stitch along the raw edge to box your corner. Stitch the second corner shut following the same directions.

7. Turn finished exterior right side out, set aside.

8. Follow the same directions to assemble lining, only keep the finished lining wrong side out.
9. Place exterior into lining (exterior is right side out, lining is wrong side out).

10. Align top raw edges as well as side seams of the exterior panel and the lining. Clip all the way around the top edge keeping both exterior and lining aligned.

11. Stitch all the way around the top making sure to leave about 2.5" opening and taking the clips out as you go. Press the top seam open and turn the bag right side out through the opening.. Gently push the lining inside your cozy.

12. Smooth the top edge with your fingers clip through both exterior and lining layers to hold them in
place and topstich along the top edge using 1/8” seam allowance.
13. Snip off any stray threads and fold the top edge down by about 1".
Materials needed for a cozy to fit a 3.5" tall pot:
exterior fabric - two 8" wide x 7" tall rectangles
lining fabric - two 8" wide x 7" tall rectangles
SF101 interfacing (or other medium weight interfacing of choice) - two 8" wide x 7" tall rectangles


1. Follow manufacturer's directions to fuse interfacing to wrong side of exterior fabric.
2. Use a ruler and disappearing fabric pen to mark a 1.5" square for small size (and 1.75" for larger size) along both bottom corners. Cut them out.

3. Mark and cut out corners on second exterior panel as well as both lining panels.

4. Place exterior panels right sides together. Stitch along the bottom edge only, backstitch at the beginning and end. Press the seam open. Use 1/8" seam allowance and stitch along both sides of the seam - this step will help your bottom seam to stay nice and flat.


5. Bring both panels right sides together, pin to prevent shifting and stitch along the side edges backstitching at the beginning and end. Press the seams open.

6. Align side seam on top of bottom seam, pin or clip to hold corner seam aligned. Stitch along the raw edge to box your corner. Stitch the second corner shut following the same directions.

7. Turn finished exterior right side out, set aside.

8. Follow the same directions to assemble lining, only keep the finished lining wrong side out.
9. Place exterior into lining (exterior is right side out, lining is wrong side out).

10. Align top raw edges as well as side seams of the exterior panel and the lining. Clip all the way around the top edge keeping both exterior and lining aligned.

11. Stitch all the way around the top making sure to leave about 2.5" opening and taking the clips out as you go. Press the top seam open and turn the bag right side out through the opening.. Gently push the lining inside your cozy.

12. Smooth the top edge with your fingers clip through both exterior and lining layers to hold them in
place and topstich along the top edge using 1/8” seam allowance.
13. Snip off any stray threads and fold the top edge down by about 1".

That's it, finished!! Pretty easy, wasn't it?
Oh, have you noticed? These little cozies are reversible.
Now place your pretty little plant (or any small objects you'd like to store in there) inside and admire. And, as always, if you make a project using any of my tutorials please add it to my Flickr group or use #sotakhandmade if posting on Instagram.


I love seeing all your amazing creations. Svetlana