Wednesday, May 16, 2012

scrappy coasters {tutorial}


Last night I played with my scraps and made these fun QAYG coasters. You know how much I love bright, happy colors, so this project was pure heaven.


Each coaster measures 5.5" x 5.5". Would you like to make some of your own? Here's a tutorial.

What you'll need to make one coaster:
fabric scraps - any size, any color
batting - at least 7" x 7"
thermal fusible fleece - I got mine from JoAnn's
fabric for the backing - at least 6"x 6"

Let's start, shall we? First, let's make the main top part of the coaster. I decided to do QAYG (quilt as you go) style patchwork using my scraps, trimming them to the size I needed.


Take your 7" x 7" batting piece, place a scrap of fabric on it, quilt it using straight lines. Your first scrap of fabric is attached to the batting base now.


Now add another scrap to the already attached fabric (right sides together), sew using a 1/4" seam, flip over, press, and quilt using straight line stitching.


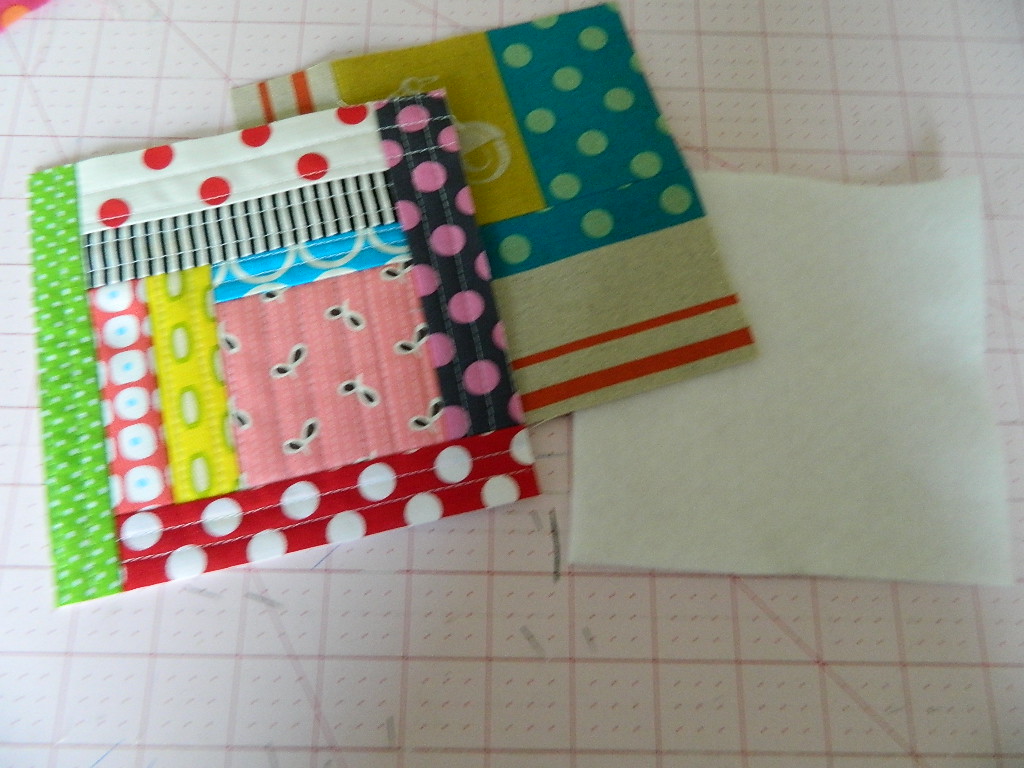
Keep adding and quilting more scraps of fabric until your whole 7" x 7" base square is covered.


This is what my square looked like.


Now trim your patchwork square to measure 6" x 6", cut the 6" x 6" backing fabric (I used some leftover Echino I had on hand, but any regular quilting fabric will do), and 5.5" x 5.5" fusible thermal fleece. The fleece is cut 0.5" smaller than the front and back of the coaster to ensure less bulk in the seams.
Note: if you don't have thermal fleece, you can just use regular fusible fleece, or even another layer of  regular batting will do.


Place fusible fleece on the wrong side of your coaster back. Center in place, iron to attach to the fabric following manufacturer's directions.


Now place top and bottom parts of the coaster on top of each other, right sides together. Pin in place.


Sew all around the coaster using a 1/4" seam, make sure to leave about 3" opening on one side for turning the coaster. Trim the corners.


Turn right side out, use pencil to make sure that your corners are nice and pointy, pin the opening closed and top-stitch 1/8"around the whole coaster. This top-stitching will sew the opening closed as well as give the coaster a nice finishing touch.

Ta-da!!!! Your coaster is now finished!!

Any questions? Let me know.

Wishing you all a nice and creative day, Svetlana.

24 comments:

  1. love those i love bright colors too

    ReplyDelete
  2. These are great! Thank you for sharing.

    ReplyDelete
  3. oh.my.gosh! Those are the cutest!! Do you mind if I pin for reference later?? Love them.

    ReplyDelete
  4. Lots of fun, love all the colours

    ReplyDelete
  5. Instant inspiration! I can hardly wait to make them! Thanks for the super tutorial!

    ReplyDelete
  6. Beautiful!!! I need some of these for my new coffee table! Thanks for the tute!

    ReplyDelete
  7. I love to do the QAYG method and these are just so sweet...love the colors and fabrics!TFS
    ~Terry~

    ReplyDelete
  8. Thanks for this awesome tutorial! What a fun, relaxing project for using up even tiny scraps. Love the way the coasters look.

    ReplyDelete
  9. They look great! What a fun tutorial :)

    ReplyDelete
  10. this is a genius project idea! Thanks for the tute. It's on my to do list!

    ReplyDelete
  11. These are so colorful and happy - love them!

    ReplyDelete
  12. These are darling and they look so fun to do! thanks for the tutorial!

    ReplyDelete
  13. I like it that you dont have to do binding around edges. :)

    ReplyDelete
  14. you brighten my day....I may not always leave a comment but I LOVE reading your posts and submerging myself in your colourful pictures....THANKS!

    ReplyDelete
  15. Beautiful! Thanks for sharing us. Greetings from Italy

    ReplyDelete
  16. I love them,they are so colorful!!!

    ReplyDelete
  17. man thanks, I have lots of 6" blocks now I will make some coasters.

    ReplyDelete
  18. Danke schön, i only Managed two last Night but will do some more.
    Gruß Sylvia

    ReplyDelete
  19. How do we print the instructions?

    ReplyDelete
    Replies
    1. look above your page. about 3/4 of the way you will see an icon for your printer Click on the icon, it takes a couple of minutes for the picture to show. If you don't understand these instructions, copy and paste the instructions into your own email and print them out.
      email me if you need to jculler682@aol,com

      Delete

Related Posts Plugin for WordPress, Blogger...