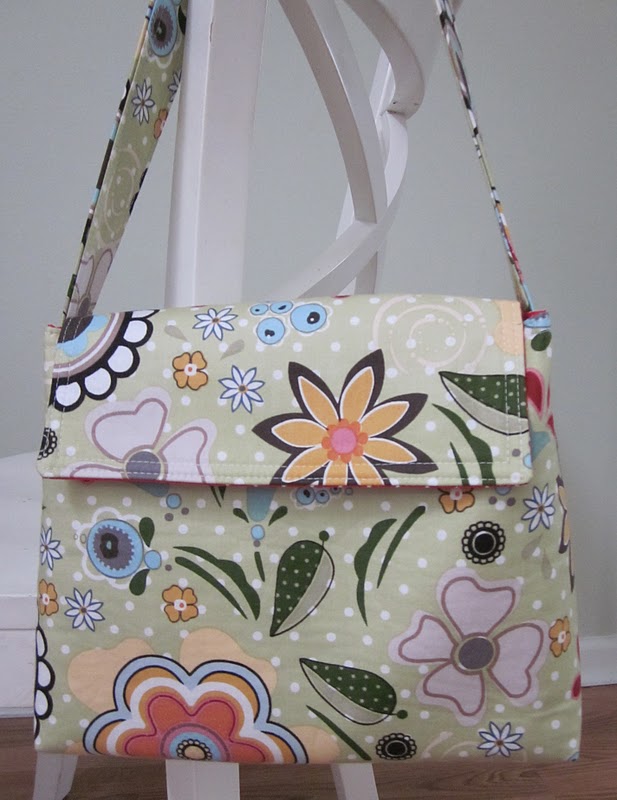
Happy Friday, everyone!
I got so many wonderful comments when I posted about lunch boxes I made for my daughters and many of you asked for a tutorial. It's been a while since then and I finally finished it. Yay!!!! I hope you give it a try. If you have any questions, just write me a note in the comment section.


I got so many wonderful comments when I posted about lunch boxes I made for my daughters and many of you asked for a tutorial. It's been a while since then and I finally finished it. Yay!!!! I hope you give it a try. If you have any questions, just write me a note in the comment section.

LUNCH BOX TUTORIAL
Materials needed : 1/2 yard exterior fabric (fabric A)
1/2 yard fabric for lining (fabric B)
1/2 yard fusible fleece
1/2 yard mid-weight interfacing
3" piece of velcro
Step 1: Cutting the fabric

FABRIC A: cut two 10" x 13" rectangles for lunchbox body
cut one 9" x 6 " rectangle for the flap
cut one 4" x 27" for strap handle
FABRIC B: cut two 10" x 13" rectangles for the lining
cut one 9" x 6 " rectangle for the flap
FUSIBLE FLEECE: cut two 10" x 13" rectangles
cut one 9" x 6 " rectangle for the flap
cut one 9" x 6 " rectangle for the flap
INTERFACING: cut two 10" x 13" rectangles
cut one 9" x 6 " rectangle for the flap
cut one 4" x 27" for the strap handle
cut one 9" x 6 " rectangle for the flap
cut one 4" x 27" for the strap handle
Step 2: Attaching fusible fleece and interfacing to exterior fabric, lining, and handle.
Iron fusible fleece to all FABRIC A main lunchbox body pieces (two 10 x 13 and one 6 x 9 rectangles). Then fuse the interfacing to all FABRIC B pieces and the handle.
Please refer to manufacturer's direction to make sure that fleece and interfacing is fused properly.
Step 3: Attaching velcro to flap lining and 1 panel for exterior of the bag.
Please refer to manufacturer's direction to make sure that fleece and interfacing is fused properly.
Step 3: Attaching velcro to flap lining and 1 panel for exterior of the bag.
Put one part of velcro closure on the flap lining about 1.5" from the edge of the 9" side. Pin in place and sew all around to attach in place.
Put second part of velcro on one 10 x 13" exterior fabric about 2" from the edge of the 13" side, center it, pin in place, and sew all around the velcro (make sure to attach velcro close to the 13" side of the main panel that's going to be the top of the lunchbox). You can set both pieces aside for now.
Put second part of velcro on one 10 x 13" exterior fabric about 2" from the edge of the 13" side, center it, pin in place, and sew all around the velcro (make sure to attach velcro close to the 13" side of the main panel that's going to be the top of the lunchbox). You can set both pieces aside for now.
Step 4: Making a strap handle.
Fold your interfaced handle fabric in half, along the 27" side, and iron.

Fold each long edge in 1/4 inch and iron again.

With wrong sides together and small fold nicely tucked in, pin the handle closed and double topstitch along both sides.


The strap is now ready. Put aside for now.
Step 5: Making a flap.
Place FABRIC A and FABRIC B lining pieces on top of each other - right sides together.

Pin and stitch around 3 sides ( 2 short and 1 long ones), make sure to stitch around the side where velcro is attached to the right side of FABRIC B (lining) of the flap.

Clip corners, do not cut into the stitches.

Turn right side out, iron, pin, and double topstitch all around the 3 finished sides.

Step 5: Sewing the exterior and the lining of the main body of the bag.
Put 2 FABRIC A (main body) pieces right sides together, stitch all around the 3 sides. Now make sure that the part where Velcro is attached is left open (that's going to be the top of our bag).

Repeat the process with FABRIC B (lining of the bag). Note: there's no Velcro attached to the lining part of the main bag, but if you have a directional fabric, make sure to leave the part that's going to be the top of the lining open.
Important!!! While sewing around the 3 sides of FABRIC B parts, leave a 5" gap on the bottom of the bag lining, we are going to use this opening to turn the bag right side out.

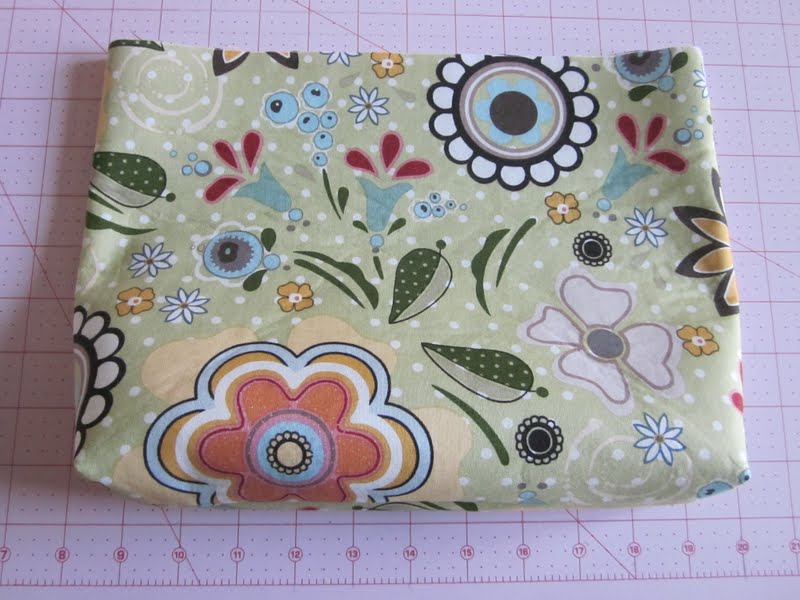
Step 7: Shaping the exterior and the lining of the main bag.
This step is a little tricky, so I took a lot of pictures along the way, I hope that makes it clearer.
Iron seams open on both the exterior of the bag , as well as the lining. Pinch the corner, holding open seams on top of each other.

Using a ruler, measure 1.5 inches from the tip of the corner, mark the line.

Sew along the marked line and trim.


Repeat the same process for the second corner on the bag lining, as well as both corners on the exterior of the bag. Keep the lining wrong side out, turn the exterior of the bag right side out. Push the corners out to make them nice and pointy.

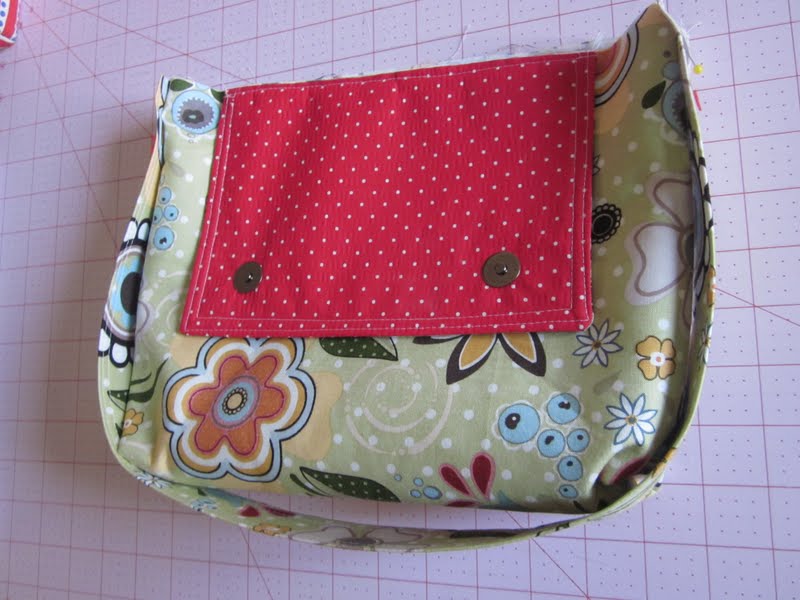
Step 8: Attaching flap to the exterior part of the bag.
Please note, I used magnetic snaps while working on my sample lunchbox. Yours is going to have velcro where my snaps are. Sorry about the confusion.
Center the flap, exterior fabric side down, on top of the exterior main bag.

Pin and sew in place.

Step 9: Attaching the handle.
Center one end of the handle along one side of the exterior main bag. Pin in place, stitch over a few times to make sure handle is nice and secure. Attach the other side of the handle, pay attention not to twist the handle.

Step 10: Attaching the exterior and the lining together.
Put exterior and the lining parts of the bag together, right sides touching. Match the top raw edges and make sure the handle and flap are nicely tucked in, pin in place.


Stitch all around the top pinned edges.
Remember the 5" opening we left in the lining? Use that to turn the bag right side out by pulling both lining and the exterior through the opening.

With the bag is right side out, push all the corners of the exterior out.

Stitch the opening in the lining closed and push it inside of the exterior of the bag. Iron along the top edge and double topstitch.
Step 10: Admire your finished lunch box.

