Hi everyone, welcome!
As promised, I'm back with a tutorial on how to make your own improv blocks using stack and slash method. I used these improv blocks to make this quilt for my son.

With regular piecing methods we usually work on one or two blocks at a time. This method, however, makes it possible to make 6 blocks at once. You will need six 16" x 16" squares of fabric. I think using 3 solids and 3 coordinating prints makes for a nice, balanced block, but you can go all solids or all prints if you prefer. This was my stack of fabric, but I actually ended up substituting some of the ash grey for a black print to add more balance to my blocks. I hope that won't be confusing, sorry.

Stack all 6 of your squares, right sides up, on top of each other. Make sure they line up well, it's very important to have them nice and straight, all sides aligned perfectly.

Before we start cutting, make sure you have a sharp blade in your rotary cutter - we are cutting through 6 layers of fabric, so a sharp blade will ensure that all cuts are precise.
I'm not going to give you precise measurements on where exactly to cut. It is, after all, an improv block we are working on. What I usually do is to draw a small picture showing how I want my block to look. There are so many options, here are some you could consider using:


Now we are ready to cut. We will start cutting from the outside of the block, working our way to the middle. Use the picture of the block you drew in the previous step as your reference. This is how I cut my blocks. Each part is numbered, I start with #1 and finish with #9.


Please note: when cutting each part of the block, just move the whole piece a little out of the way so you don't cut into it as you go on to cutting other parts. It also helps to rotate your cutting board as you.
Once your whole stack is cut the way you like, we are going to make sure that each block has all the fabrics in it. Pick up just the top fabric from your #9 middle part of the block and place it, right side up, in the very bottom, under all the other layers of part #9. Now get two top layers of part #8, put both of them under the rest of the layers (make sure all the parts stay right side up). Do the same with part # 7.

Now on to parts # 1 and 6. Lift up the 3 top layers of fabric and put those under the rest of the corresponding pieces. For parts #2 and 5, lift up 4 top layers, place them on the bottom. For the part #3, lift up 5 layers of the fabric, put them on the bottom. And finally, the last piece #4 stays the way it is.

This is what your top block should look like. All 6 fabrics in one block, parts for the other 5 blocks are nicely stacked underneath.
Note: it's at this point that I realized my blocks needed a little more balance and I decided to substitute some of the ash grey for the darker color. This is what my top block looked like after the adjustments.

Phew, now that's done, we are ready to sew. It's best to work on one block at a time, this way you can make sure that all blocks have each fabric in it and are balanced well. To sew the block together, we start in the middle, first joining parts #9, 8, and 7. Press your seems to the side.

Now let's add parts # 5 and 6, trim the pieces as you go.

Keep adding and trimming all the other parts of the block until all the 9 pieces are sewn together.

Work on the other 5 blocks. When all 6 of them are finished, square them all up to measure 12.5".
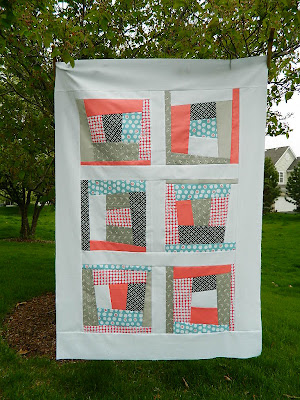
Congratulations! Now you have 6 improv blocks finished and ready to be used in your quilt. You could go ahead and make more blocks. I decided to make a baby quilt, so 6 blocks were all I needed. I rotated some of the blocks when I put them in the quilt layout, I think that adds a little more interest to the quilt. I joined my blocks with 2.5" sashing and added a 5" border all around. Ta-da!!! This is my new quilt top.
Hope you give this quick and fun way of making blocks a try. And, as always, if you have any questions, just let me know.
Svetlana
As promised, I'm back with a tutorial on how to make your own improv blocks using stack and slash method. I used these improv blocks to make this quilt for my son.

With regular piecing methods we usually work on one or two blocks at a time. This method, however, makes it possible to make 6 blocks at once. You will need six 16" x 16" squares of fabric. I think using 3 solids and 3 coordinating prints makes for a nice, balanced block, but you can go all solids or all prints if you prefer. This was my stack of fabric, but I actually ended up substituting some of the ash grey for a black print to add more balance to my blocks. I hope that won't be confusing, sorry.

Stack all 6 of your squares, right sides up, on top of each other. Make sure they line up well, it's very important to have them nice and straight, all sides aligned perfectly.

Before we start cutting, make sure you have a sharp blade in your rotary cutter - we are cutting through 6 layers of fabric, so a sharp blade will ensure that all cuts are precise.
I'm not going to give you precise measurements on where exactly to cut. It is, after all, an improv block we are working on. What I usually do is to draw a small picture showing how I want my block to look. There are so many options, here are some you could consider using:


Now we are ready to cut. We will start cutting from the outside of the block, working our way to the middle. Use the picture of the block you drew in the previous step as your reference. This is how I cut my blocks. Each part is numbered, I start with #1 and finish with #9.


Please note: when cutting each part of the block, just move the whole piece a little out of the way so you don't cut into it as you go on to cutting other parts. It also helps to rotate your cutting board as you.
Once your whole stack is cut the way you like, we are going to make sure that each block has all the fabrics in it. Pick up just the top fabric from your #9 middle part of the block and place it, right side up, in the very bottom, under all the other layers of part #9. Now get two top layers of part #8, put both of them under the rest of the layers (make sure all the parts stay right side up). Do the same with part # 7.

Now on to parts # 1 and 6. Lift up the 3 top layers of fabric and put those under the rest of the corresponding pieces. For parts #2 and 5, lift up 4 top layers, place them on the bottom. For the part #3, lift up 5 layers of the fabric, put them on the bottom. And finally, the last piece #4 stays the way it is.

This is what your top block should look like. All 6 fabrics in one block, parts for the other 5 blocks are nicely stacked underneath.
Note: it's at this point that I realized my blocks needed a little more balance and I decided to substitute some of the ash grey for the darker color. This is what my top block looked like after the adjustments.

Phew, now that's done, we are ready to sew. It's best to work on one block at a time, this way you can make sure that all blocks have each fabric in it and are balanced well. To sew the block together, we start in the middle, first joining parts #9, 8, and 7. Press your seems to the side.

Now let's add parts # 5 and 6, trim the pieces as you go.

Keep adding and trimming all the other parts of the block until all the 9 pieces are sewn together.

Work on the other 5 blocks. When all 6 of them are finished, square them all up to measure 12.5".
Congratulations! Now you have 6 improv blocks finished and ready to be used in your quilt. You could go ahead and make more blocks. I decided to make a baby quilt, so 6 blocks were all I needed. I rotated some of the blocks when I put them in the quilt layout, I think that adds a little more interest to the quilt. I joined my blocks with 2.5" sashing and added a 5" border all around. Ta-da!!! This is my new quilt top.

Hope you give this quick and fun way of making blocks a try. And, as always, if you have any questions, just let me know.
Svetlana